Thursday, October 29, 2015

Floatation !?!?


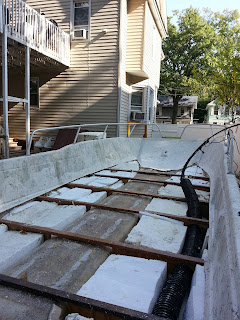
I didn’t want to put in two part pour in floatation foam, this stuff always holds moisture. I almost ordered 250 swim noodles to use as floatation, but as luck would have it a guy had the worlds biggest block of Styrofoam on craigslist 8’x4’x2′. I ended up buying it and cutting it up to fit in between the bulkheads.


I used a reciprocating saw along with a 12″ wood blade to cut up the giant block of foam. Messy and fun at the same time! I only used half the block so if anyone needs some just contact me I am in central New Jersey. I also used a little bit of spray in insulation foam to tack the Styrofoam blocks and pieces in.


Saturday, October 24, 2015

Tabbing in bulkheads with fiberglass.


I wet out the wood and glassed in all the tabs.
Its pretty straight forward just wet the wood out put your piece of fabric in the wet area and wet the resin out well. Then use a fiberglass bubble busting roller to press the fabric well into the work this also helps to distribute the resin into the fabric and bring the excess resin to the surface. The fabric used to tab in the bulkheads is 1708 bi axle fiberglass cloth.
 
Sorry no pictures but I eventually put another two coats of resin over all exposed wood.
 
After the resin cured the sides of the gunwales no longer bounced and wiggled they were now very rigid. I tested this by hanging my full weight off the rails. After the deck is glassed in I am sure it will become even more solid.


For safety make sure you wear chemical proof gloves and a skin protection like a long sleeve shirt.
 
This is what happened to me when I got some liquid hardener on my shirt and didn’t notice till it started to hurt, a nice chemical burn. The picture is from 7 days later, it actually watered blistered and bruised the first few days. A friend of mine said I could sell it as Tattoo brightener, call it peel bright. I said it be more like pour and scream : / . So please be careful even the resin will burn your skin if not protected.


.

Under floor cables controls and wiring.


Originally the rolled liner version of these boats which is the model I have came with all the cables and controls mounted to the top of the deck. This sucks for a lack of better words and of course while I have the chance I am running all the cables under the deck. I used a piece of rigid drainage hose I got from the big orange store to run the cables and wiring through, surprisingly the hose was only $9. 

The two ends under the center console and end near the transom will eventually be boxed and the box by the transom will also house the starting battery.


Cutting tabs.


I spent a bunch of time cutting tabs, 96 of them ( 8 per bulkhead front and back )  to glass the bulkheads in. They are 8 inches wide by various lengths depending on the size of each bulkhead. 8 inches wide are the smallest I would make them so the glass has plenty of area to hold onto the bulkheads and hull. Of course you could always fully glass the bulkheads but this hull is really light, its not necessary. What’s more important is the entire bulkhead is coated with resin so they wood never rots.

The tabbing material is 1708 Bi axle cloth. I am using polyester resin mostly because of the price per gallon compared to epoxy.


Final setting of all the bulkheads.


I set all the bulk heads in place and used the orange store $1.00 clamps to hold the bulk heads in place. One thing to note here is that it is important is I set every second bulkhead at exactly 48″ inches on center measured from the transom. This is to have the 4′ x 8′ marine plywood panels line up with the bulkhead beams for support at the seams and something to screw them down to.


Notice the bulkheads were not fitted into the channel at the bottoms of the sponsons. This is to let water travel towards the bilge for draining just incase water is ever to get into the hull.


Using 3 stainless steel screws per bulkhead the oak 1×2 beams were screwed to the bulkheads from the top. Remember the 1x2s are dadoed so they hold the bulkheads in perfect alignment.


Cleaning and preping the hull.


I went ahead and pressure washed the hull in preparation for the final fitting of the bulkheads and glassing in the fiberglass tabbing. The hull needs to be clean and dust free so the polyester resin can get a good mechanical bond and hold those bulkheads in place, my fishing buddies are 300lbers and after all this is a catamaran it will see plenty of big chop and waves.


Notice the lip of the old deck that was left around the entire circumference of the inside of the hull. I will use this to align the bulkhead oak beam heights this will insure I end up with a level and straight decking. The new deck will lay on this lip.


More Bulk heads and cross beams.


While tedious its well worth cutting the bulkheads perfectly, a 1/8 of an inch smaller or so, the purpose of cutting them smaller is to eliminate the possibility of a sharp spot contacting the hull and exerting pressure in one spot. Its like a women’s high heel on your foot although she only weights 120lbs that weight compressed into a 1/4 inch area feels like 1000lbs. Better to spread the pressure out like a magician laying on a bed of nails instead of all in one spot.

So what ends up happening here is the fiberglass tabs that are eventually used to hold to the bulkheads in place will spread the pressure out evenly along with and in conjunction with either caulking  the bulkheads in or fileting using thicken resin, this will ensure there's no chance of to much pressure in any one spot.


In my case I only have a few weeks to get this done due to the weather turning to cold to glass I will skip the filleting process since this is a very light hull. I did use Loctite marine (a similar product to 3m 5200 marine) on the bottom and side edges of the bulkheads.


 You will also notice from the pictures I have been coating the edges of the bulks heads with resin to make sure they are sealed from moisture. 2-3 coats on all the edges is optimal.